How I run my homelab
I’ve been using my homelab for a year now, and I’m starting to feel pretty happy about it. By “happy”, I mean I can stop tinkering and firefighting, and actually start using it.
As the sole (happy) user and maintainer, I’m writing this blog post to describe the ideas and steps behind the creation of my small lab.
Hardware
The main drivers behind my hardware choices were the following:
- Ease of replacement: No fancy enterprise-level or obscure hardware, everything has to be standard and easily replaceable in case of failures.
- Power consumption: Since it runs in my home, I wanted low power usage, which also translates to lower temperatures and less noise.
- Form factor: I wanted everything to fit in a small, portable setup that doesn’t take up an entire room.
Given those principles, the hardware I’m currently using is:
- 2x Raspberry Pi 5 - 8 GB memory
- 1x Raspberry Pi 3 - 1 GB memory
- 1x Mini ITX - Intel N100 - 8 GB memory - 3x 512 GB SSD
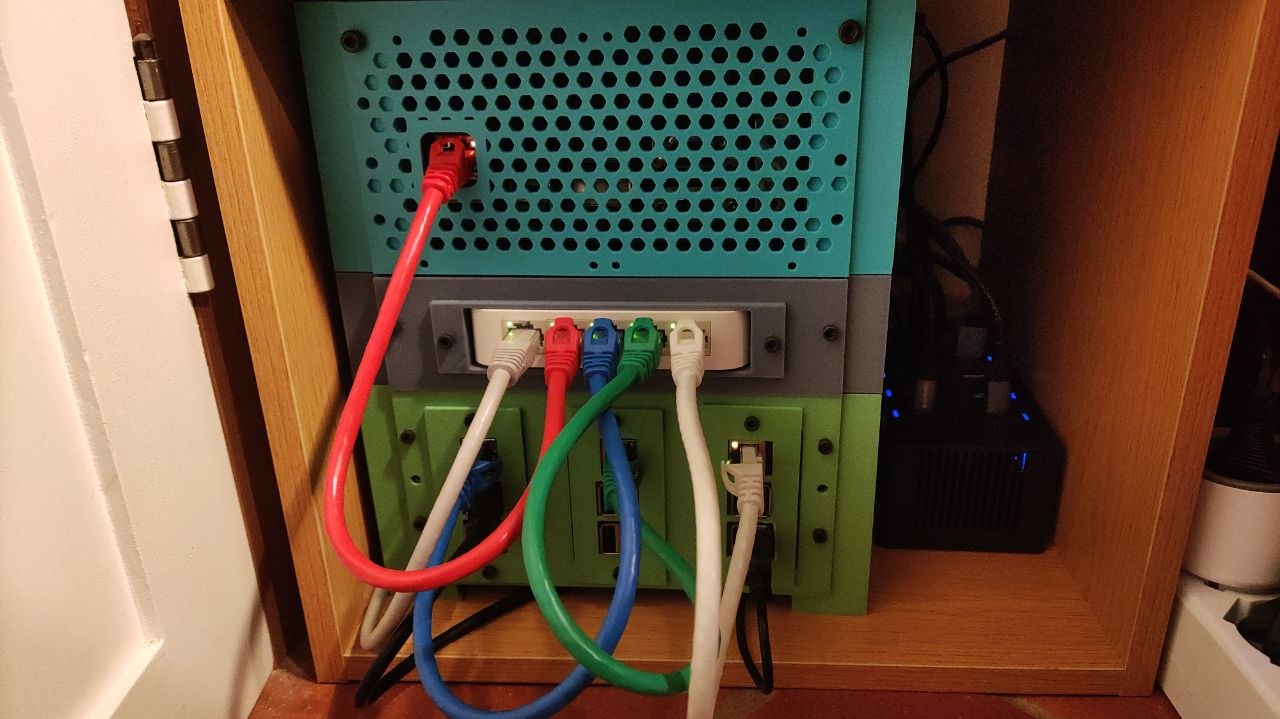
- 1x TP-Link TL-SF1005D
Rack
Online you can find many pre-built racks in all shapes and sizes, but as tinkerers we’re never 100% satisfied with something that comes with all the bells and whistles. So of course, I’ve decided to build my own.
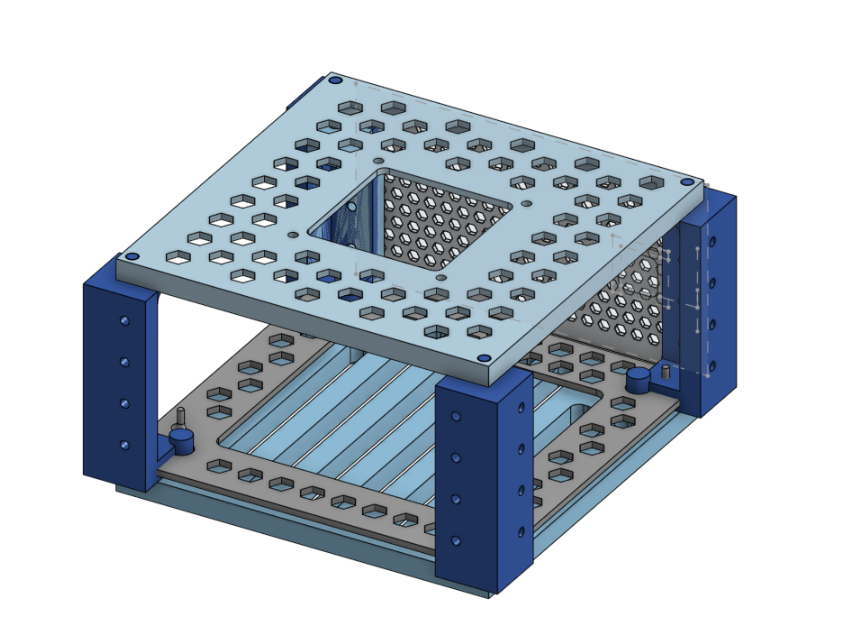
I started by designing a 3D rack to fit everything in the smallest space possible while keeping a modular design. It took a while (and more wasted filament than I’d like to admit) but in the end, it turned out pretty nice.
I’m using a BambuLab A1 Mini, which is a great printer but has a small build volume (18x18x18 cm). This added an extra challenge, since everything had to be modular as I physically couldn’t print large parts in one go.
I ended up with a simple yet modular design (I’m not a 3D designer, please forgive me): stackable layers. Each layer has vertical columns and interchangeable front plates (masks) that can expose I/O ports, hold fans, or mount components easily.
Power consumption and thermals.
The entire setup consumes about ~20W:
- 12W from the 3 RPIs
- 8W from the NAS + 3 SSDs
Under full load both disks and cpu running ~80% it can reach 30–40W, but this rarely happens in real-world usage, so overall I’m very happy with it.
The RPIs are cooled by a single 80mm Noctua fan and maintain temperatures around 40–50°C. The NAS runs completely fanless for now, although I’ve already designed a mount for a fan if needed in the future.
Software
So what’s actually running in the homelab, and how do I manage it?
Every machine runs the same Ubuntu LTS version configured using ansible.
I tried more “fancy” solutions like NixOS, CoreOS, pre-baked images, or cloud-init/ignition, but I ultimately wanted something simple and stable, not something prone to breaking changes or deprecations.
In the end, since I just install the same common packages with very minimal configuration I want to be able to run the same commands in 5–10 years and bring everything back up without surprises.
Kubernetes
I chose to run Kubernetes (using k3s), even though it goes against the goal of simplicity. The main reasons for this decision were my existing experience with running Kubernetes clusters, as well as the wide range of tooling and deployment options available for the software I wanted to use, also see kubernetes is not just for black friday
I’m running a two-node cluster: 1 master and 1 worker, both on RPIs. The master node uses an NVMe disk because Kubernetes state store tends to generate high disk I/O which already killed a few SD cards during the first year.
Cluster bootstrap is handled by a simple Ansible playbook that installs dependencies and configures both the OS and Kubernetes.
Gitops
Once the cluster is running, I use fluxcd for GitOps. It keeps all Kubernetes resources in sync with the desired state stored in Git.
This way, I can update, install, and maintain dependencies simply by pushing to a Git repository. Flux handles the deployment rollout without requiring direct access to the cluster and helps prevent state drift. It’s also useful if I ever need to recreate the cluster from scratch, since I don’t have to worry about forgetting dependencies between services and resources.
The cluster configuration is stored in a public github repository, most of the application are deployment using the provided helm chart, but I’m trying to migrate as much as possible to kustomize because I find it simpler.
Secrets management
Since the repository is public but I run sensitive services (like Immich and databases), secrets are encrypted using sealed secrets.
The encryption key is generated during cluster bootstrap and used to decrypt secrets across services.
Persistence
My home lab runs many stateful applications, some of which also require relatively high-performance storage, such as PostgreSQL databases, Immich for photo storage, and Navidrome for music streaming.
There are many storage solutions that run on top of Kubernetes, but I wanted to separate compute from storage as much as possible so that I can experiment with, scale, or even completely destroy the “compute” side of my homelab without losing important data.
The final solution was to use my ZFS NAS as storage provider: exposing ISCSI volumes to my kubernetes cluster which support mounting NFS / ISCSI volumes natively. This also enables transparent storage mounting, allowing stateful workloads to move seamlessly between nodes without issues.
This way, I can store and persist data using high-performance, redundant NAS disks while keeping volume management simple by integrating directly with the Kubernetes APIs.
Using iSCSI disks instead of NFS not only provides better performance, but is also a safer way to run PostgreSQL, SQLite, and other systems that expect block-level I/O rather than file-level access.
NAS
The NAS, which sits at the top of my rack, is based on an Intel N100 Mini-ITX board with three SSDs attached: one for the OS, and the other two mirrored as part of a ZFS pool
Since I wanted simplicity and full control over the storage, I’m not using solutions like TrueNAS or Unraid, just plain ZFS configured via an Ansible playbook.
ZFS mirrors the two SSDs and exposes volumes via an iSCSI interface to the Kubernetes cluster.
Backups
Having redundant copies of your data is good, but keeping those copies physically in the same location and on the same machine isn’t ideal. For this reason, I also maintain daily incremental backups of the ZFS volumes, which are pushed to blackbaze storage, it is relatively inexpensive and provides an S3-compatible API.
To perform the backups I wrote a small go program that runs in the NAS, it leverages the ZFS incremental snapshot + send features to take the backup and stream them directly to s3.
To avoid having too many incremental parts in case of restore I also take a new full backup every 6 months, removing the older incremental backups to save storage costs and headaches.
What I’m Running
Here’s a brief list of what I’m running in my homelab:
immich: photo manager, good google photo alternative with many nice features, good UI and native mobile app, very stable so far.
navidrome: simple and small audio streaming service, I use it to stream my music collection to multiple devices.
home assistant: (see below for more details)
eink display api: small api which provide images for my DIY smart frame built using and ESP32 and Eink display

Adguard: DNS level ad blocker for all devices in my LAN.
surf condition bot: Telegram bot which detect good surf conditions and send me short webcam videos from surf spots nearby me.
cert-manager / external dns: automatically generates ssl certficates and updates DNS records when exposing new services.
Home assistant
The lone RPI 3 is running home assistant installed directly as OS, using a zigbee dongle it is able to control zigbee devices in my home which are mainly smart switches / light bulbs.
I decided to go for zigbee as I didn’t want to rely on third-party APIs or proprietary solutions to control my home devices. Zigbee offers a standard protocol supported by many vendors which doesn’t require internet or LAN connection to work.
Valetudo
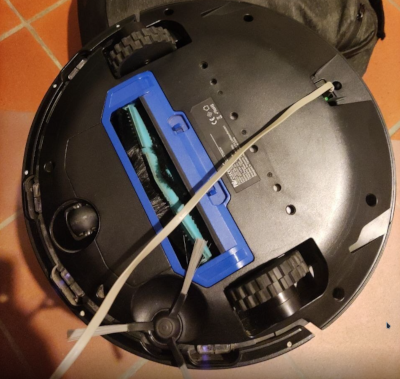
I’ve also modified my smart vacuum cleaner, which apparently runs Tina Linux, by installing valetudo on it. Valetudo is a nice software which allows you to disconnect your smart vacuum from the internet while keeping the original navigation capabilities. Using the MQTT plugin I’m able to control the vacuum cleaner directly from home assistant automations which is pretty handy.
Future ideas
- Since I’m using FluxCD only to apply kustomize/helm resource I may be able to use a simpler gitops solution.
- Experiment with immutable OS on all nodes.
- I’m building my own small metrics database as prometheus is too resource heavy for my small setup.
Conclusions
This is pretty much what I’ve done so far to build and maintain my homelab. I’ll try to keep this article updated, as I’ll be using it as a sort of brain dump. Thank you for reading this far!